Sunday, December 28, 2014

Many Thanks

Hello all you fabulous paper artists in blogland!

Let God Set Your Agenda
But this thing I did command them: Listen to and 
obey My voice, and I will be your God and you will
be my people; and walk in the whole way that I 
command you, that it may be well with you.
Jeremiah 7:23

Hope you are all well :) only a few days until the start of another year, I wonder what it will bring for us all :) 
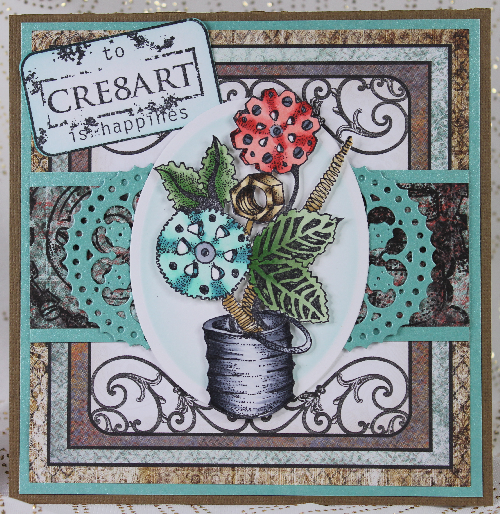
My husband and I moved over Thanksgiving and things are just starting to finally wind down. I now have a huge room in the basement for my craft room, it's wonderful to having all this extra space. I will be posting once again. Love to share my creations with all of you. Oh and speaking of creations I have one for you today.
Base card 6 1/4″ x 4 1/2″


Paper Temptress Products Used:
Astrobright Colored Package - Celestrial Blue

Other Products Used:
Stamps: Unknown
Paper: Stampin Up Christmas Paper, Silver Glitter Paper
Ink: Versa Fine – Onyx Black
Accessories: Spellbinders – Oval Bliss and Victorian Tags, Marianne Snowflake Die, Pop Dots

Hope I was able to inspire today and thanks for stopping by!

Thank you very much for your comments they really mean a lot!

Don’t forget to stop by papertempress.com for all your cardstock need. 


Wednesday, November 12, 2014

The Witch Is Back

Hello all you fabulous paper artists in blogland!

It's a Promise
Let Your mercy and loving-kindness come
also to me, O Lord, even Your salvation
according to Your promise. 
                              PSALM 119:41

Hello out there in blogland, hope everyone is keeping warm on this chilly November evening!? 
Here is a Halloween card I created for Paper Temptress. 

 Paper Temptress Products:

Other Products Used:
Ink: Memento Tuxedo Black
Accessories: Spellbinders 5 x 7 Reflective Moment – Fancy Tags Two – Big Scalloped Ovals Large – Standard Circles Large, Impression Obsessions Witch Die – Mega Spatter Stamp, Black Rhinestones, Martha Stewart Punch, Double Sides Tape, Pop Dots
Don’t forget to scroll down and check out what the other designers created for you.

Hope I was able to inspire today and thanks for stopping by!
Thank you very much for your comments they really mean a lot!
Don’t forget to stop by papertempress.com for all your cardstock need. 


Monday, November 10, 2014

Birthday Gears

Hello all you fabulous paper artists in blogland!

Bless Yourself
I love those who love me, and those who seek me
early and diligently shall find me.
                             PROVERBS 8:17

Hello everyone out there in blogland! Hope you're all getting ready for that blast of cold air that's coming! Get ready to put on those snuggies!!! 
Today I would like to share with you a card that was created for Heartfelt Creations. This card is the last of the cards that I will be posting for Heartfelt Creations, saddens me! As I had posted a few days ago, there are other things going on right now that takes high priority. I will let you all know what's going on in the coming weeks. 
How about we get on with the card I created!

 Heartfelt Creations Products and Products Sold By HC:

Other Products Used:
Paper: Brown, White and Green Shimmer Cardstock
Ink: Versa Embossing Ink
Accessories: Spellbinders 3D M-Bossabilities Creative Cogs, Spellbinders Standard Circles Large, Spellbinders Sprightly Sprockets, Copper Embossing Power, Brad, Pop Dots

Instructions: Card base 7 3/8" x 5 3/8" in brown. Cut green shimmer CS for a mat 7 1/8" x 5 1/8". Cut a piece of white cardstock 6 7/8" x 4 7/8" and emboss using the Spellbinder Creative Cogs. Next paint with the 3D paints and adhere all three pieces together. Die cut a piece of pattern paper with the #2 die from Standard Circles Large. Stamp image in center using versa ink, add the copper embossing powder and heat set and adhere to card. Die cut the largest gear from Sprightly Sprockets and adhere as shown. Die cut some smaller gears and paint them with the 3D paints, adhere them to card as shown. I doubled up on one of the gears and added a brad. Choose a blank tag from pattern paper, die cut, stamp sentiment with versa ink, apply embossing powder, heat set and place it onto card.

Thank you very much for your lovely comments, they really mean a lot!
Hope I was able to inspire you today, and thanks for stopping by!

Wednesday, November 5, 2014

Plates And Gears Bouquet

Hello all you fabulous paper artists in blogland!

Accept God's Invitation
I [the Lord] will instruct you and teach you in the 
way you should go; I will counsel you
with My eye upon you.
                         PSALM 32:8

Hello and happy Wednesday to all! I feel so bad that I haven't posted for about a week and a half now. My husband and I have been working on a project together and that has and is taking up a lot of my time. We have a ways to go before we are done, so please bare with me. I will try my darn-est to get things posted. 
Don't know if all of you know this or not but I am no longer on the design team for Heartfelt Creations. Although the card I am posting today was a created for H.C.. It was a pleasure working with those girls as a team. They was so helpful and very friendly to work with, someone was always there to answer your questions. I will miss them so much! It was time for me to move on for I have so many new things I want to try and things that need to be finished. 

 Heartfelt Creations Products and Products Sold By HC:

Other Products Used:

 Paper: Brown and White Cardstock, Aqua Shimmer Cardstock; Ink: Memento Tuxedo Black, Stampin Up Bermuda Bay, Copics; Accessories: Spellbinders Classic Ovals Large, Pop Dots.

Instructions: Card base 5 3/4" 5 3/4" in brown. Cut aqua shimmer CS 5 1/2" x 5 1/2". Cut pattern paper 5 1/4" x 5 1/4" and adhere all together. To create banner, cut 5 1/4" x 2" in aqua, cut pattern paper 5 1/4" x 1 3/4", adhere together and center on card. Die cut using the #1 large oval then with cardstock still in die, distress some ink towards the center then place onto card as shown. Die cut one large gear, cut in half and place on each side of oval and adhere. Stamp sprocket bouquet, color, fussy cut and adhere to oval with pop dots. Stamp sentiment, die cut and distress edges and place in corner.

Thank you very much for your lovely comments, they really mean a lot!
Hope I was able to inspire you today, and thanks for stopping by!


Sunday, October 26, 2014

You Inspire Me

Hello all you fabulous paper artists in blogland!

The Grace of God
I have raised you up for the very purpose of
displaying My power in [dealing with] you, so that My
name may be proclaimed the whole world over.
                                                                              ROMANS 9:17

Hello friends and a very happy Sunday to all! Today I bring you a card that was created for Heartfelt Creations from the All Geared Up Collection. I had know idea when I first laid my eyes on this collection that there would be so many different ways you could use gears. Once I started looking through these beautiful pattern papers, the stamps and dies, the ideas just started flowing, and when I saw the finished projects I was quite impressed. Once you see what the other gals created with this set, you too will be saying WOW! 

 Heartfelt Creations Products and Products Sold By HC:
Paper: Sea Green, Caramel, and Vanilla Cardstock
 Ink: Stampin Up - Bermuda Bay, Ranger Adirondack Earthtones - Espresso, Caramel, Copics - E33, 37, 39, 59, 95, 97, 99, BG11, 13, 15
 Accessories: Philips Screw Brads, Pop Dots, Spellbinders Standard Circle Small, Standard Circle Large.

Instructions: Card base is a 6" x 6" in sea green and distress edges. Choose a card panel from pattern paper and cut it 5 1/2" x 5 1/2" (this is the only piece that did not get distressed). Cut caramel CS 5 1/4" x 5 1/4" and distress edges. Cut vanilla CS 5" x 5", stamp cogs, gears twice, distress the edges and adhere all four pieces together. For the middle, cut a piece of sea green CS 5 3/4" x 2 1/8". Cut caramel CS 5 3/8" x 1 3/4". Cut vanilla CS 5 1/8" x 1 1/2", distress all three pieces, adhere together and onto card as pictured. Die cut chain (need 13 links) and link together. Die cut large gear, distress, attach chain link to gears and adhere in center as shown. With the sea green die cut #2 small circle and once again distress edges, adhere with pop dots. Stamp image on vanilla CS, color, die cut with #3 large circle die, distress, adhere pop dots and place over sea green. Die cut small flower gears, distress, shape, insert screw brads and on each side of image. With the plate die draw a line around the outer edge, fuzzy cut and place on card. Stamp plate image, distress those edges, apply pop dots and place onto card as shown.

Thank you very much for your lovely comments, they really mean a lot!
Don't forget to stop by the Heartfelt Creations Blog and check out what the other designers created for you this week.
Hope I was able to inspire you today, and thanks for stopping by!

Tuesday, October 21, 2014

Stripped Gears And Flowers

Hello all you fabulous paper artists in blogland!

Receive His Grace
For we are God's [own] handwork (His workmanship), 
recreated in Christ Jesus, [born anew] that
we may do those good works which God predestined
(planned beforehand) for us [taking paths which He
prepared ahead of time], that we should walk in them
[living the good life which He prearranged and 
made ready for us to live].
                                EPHESIANS 2:10

Hello friends and happy Tuesday! Yes I'm off to a late start. Things have been crazy around here lately. Never a dull moment, can't get bored that way. LOL 
I would like to share with you this lovely card that I created Heartfelt Creations using the All Geared Up Collection. 

 Paper: Dark Brown, Medium Brown, Tan, Ivory and Blue Shimmer Cardstock
 Ink: Ranger Adirondack Earthtones Espresso
 Accessories: Spellbinders - Grand Labels Twenty-Three, Labels Thirty-Six, Glitter Brads, Pop Dots, Really Reasonable Ribbon Seam Binding Tobacco, Bow-it-All V2.0.

Instructions: Cut the card base from Spellbinders Grand Labels Twenty-Three #2 die in dark brown cardstock. Die cut next mat using the #3 die in blue shimmer cardstock. Stamp cogs and gears on tan CS, then die cut using the #4 die. Next take that same die and trace around the outer edge onto medium brown cardstock and fussy cut. Distress the edges on all 4 pieces and layer them together. Die cut ivory CS using the #2 die from Labels Thirty-six, stamp grunge image multiple times then stamp sentiment in center. Next take that same die and trace around the outer edge onto blue shimmer paper, fussy cut, distress the edges of both these pieces and adhere together. Apply pop dots and adhere to card. Now it is time to create some gear flowers. Die cut six flowers, paint all six with 3D paint, shape, adhere together, add a brad in flower center and apply onto card. Create a bow using the Bow-it-All and adhere in center bottom of card as shown.

Thank you very much for your lovely comments, they really mean a lot!
Don't forget to stop by the Heartfelt Creations Blog and check out what the other designers created for you this week.
Hope I was able to inspire you today, and thanks for stopping by!

Tuesday, October 14, 2014

Nuts And Bolts Of Life

Hello all you fabulous paper artists in blogland!

Jesus Is Our Standard
His intention was... that [we might arrive]
at really mature manhood (the completeness of
personality which is nothing less than the standard
height of Christ's own perfection), the measure of
the stature of the fullness of the Christ and the 
completeness found in Him.
                              EPHESIANS 4:12-13

Hello friends and happy Tuesday! Here we go again with another card created for Heartfelt Creations using the All Geared Up Collection. Here's a card I thought would be great for the nut in your life. LOL 
Heartfelt Creations Products and Products Sold By HC:
Paper: Red, Dark Brown and Dotted Sea Green Cardstock
 Ink: Versafine Onyx Black and Color Pencils
 Accessories: Dew Drops, Pop Dots.

Instructions: Card base 6" x 6". Cut mat 5 5/8" x 5 5/8" from pattern paper and adhere to base. Cut first frame 5 3/8" x 4" and adhere to card. Cut two banners from pattern paper and adhere to the first frame as shown. Cut second frame 5 1/8" x 3 3/4". Cut the third frame 4 7/8" x 3 1/2" from light colored pattern paper, stamp image, color, apply pop dots to both the second and third frames and place onto card. Add Dew Drops as pictured.

Thank you very much for your lovely comments, they really mean a lot!
Don't forget to stop by Heartfelt Creations Blog and check out what the other designers created for you this week.

Hope I was able to inspire you a little bit today, and thanks for stopping by!